Technical
details
Registering
Alignment
File Groups
Stacking
Stacking Methods
Drizzle
Comet Stacking
RAW images development process
Registering
Star
detection
For each
picture DeepSkyStacker will attempt to automatically detect the
stars. In simple terms, DeepSkyStacker
considers that a star is a round
object whose luminance decreases regularly is every direction, and whose radius
is no more than 50 pixels. Note
that DeepSkyStacker will reject elongated star images which might occur if
your mount isn't tracking correctly. Once the star is detected its exact center is computed by fitting a Gaussian curve to
the luminance.
DeepSkyStacker will only stack images that contain at
least eight stars that are common between
all light frames. In practice this
means
that you should set the Star Detection Threshold in the Settings.../Register
Settings or Register checked pictures/Register Settings/Advanced dialogue so that
DeepSkyStacker detects 20 or more stars to stand a good
chance of finding eight stars in common between all
light frames.
Application of darks, flats and offsets
before registering
If dark, flat and/or offset frames are checked they are
automatically applied before the registering process.
With light frames containing a lot of hot pixels it is highly recommended to
check dark frames in order to avoid false stars detections which may highly
perturb the alignment.
Automatic detection of hot pixels
Optionally DeepSkyStacker tries to detect hot pixels during
the registering process to avoid identifying false stars.
You should note that this option only works for monochrome images and RAW
images in the Super-pixels,
Bayer.Drizzle, bilinear and AHD interpolation modes.
Adjusting the
star detection threshold
The star detection threshold is 10% by default (10% of
the maximum luminance).
| You can modify this threshold in the Advanced
tab of the "Register checked pictures/Register Settings" dialog, or by
selecting Settings.../Register Settings.
Reducing the Star Detection
Threshold will result in DeepSkyStacker finding
more (fainter)
stars, on the other hand if you increase the
threshold, then only brighter stars will be detected and so this will
reduce the
number found.
Setting the threshold so low that many
hundreds of star are found will be counter-productive as there will be much
more data to process for star registration and if too many stars are
detected there is a greater chance of mis-registration. You should
probably aim for over 20-25
stars and no more than a couple of hundred
or so.
If you
have set the detection threshold low and DeepSkyStacker is still not
finding enough stars because the image is underexposed, you can increase
the image
brightness by using the "Brightness" adjustment in the Raw/FITS
DDP Settings.
If your images
are noisy (as a
result (e.g.) of Light Pollution) you may need
to enable the "Reduce the noise by using a Median
Filter" option.
To help you finding the best threshold for your light
frames you can compute the number of stars that will be detected. To do
this, DeepSkyStacker uses the first checked light frame and temporarily activates hot pixel detection.
You should note that this number is only a guide
and that the real number of detected stars may vary if you have checked dark,
offset and flat frames. |
 |
Registering results
The
registering results (number of detected stars, position, luminance of each star)
are saved in a text file which name is the name of the picture file with an .Info.txt
extension.
Thus it is not necessary to register the picture again for a future stacking
process.
Registering results and parameters
The
registering results are highly dependant of the selected parameters (especially
the raw development parameters).
If these parameters are modified it is necessary to register the pictures again.
Stacking
after registering
DeepSkyStacker can chain registering and stacking processes. You just have to
give the percentage of the pictures that you wish to keep at the end of the
registering process to start the stacking process. Only the best pictures will
be used in the stacking process.
Thus it is possible to launch the full process then to go to bed knowing that
after a good night sleep it will be possible to view the first results.
Alignment
Offsets
and angle computing
During the alignment process the best picture (the picture with the best score)
will be used as the reference frame unless you choose another reference frame
using the context menu.
All the offsets and rotation angles are computed relative to this reference
frame.
The offsets are rotation angles are computed by identifying patterns of stars in
the frames.
To put it simply the algorithm is looking for the largest triangles of which the
side distances (and so the angles between the sides) are the closest.
When a sufficient number of such triangles is detected between the reference
frame and the frame to be aligned the offsets and rotation are computed and
validated using the least square method.
Depending of the number of stars a bisquared of bilinear transformation is used.
For more information about the algorithms which inspired the one used by
DeepSkyStacker you can consult the following
sites:
FOCAS Automatic Catalog Matching Algorithms
Pattern
Matching with Differential Voting and Median Transformation Derivation
Automatic use of previously computed offsets and angles
DeepSkyStacker is saving all the transformations between a reference light
frame and all the other light frames so that it is not necessary to compute them
again if the registering info have not changed.
The info is saved in a file named after the reference frame (and in the same
folder) with an .stackinfo.txt extension.
File Groups
File Groups may
be used to simplify multiple nights on the same object file management by logically grouping files for
each imaging session.
If you use only the Main Group DeepSkyStacker is working exactly like
before the introduction of File Groups.
There are two kinds of File Groups: the Main Group and all the others groups.
-
Light Frames from the Main Group may
only be associated with Dark, Flat and Offset/Bias Frames from the Main
Group.
This is the behavior of DeepSkyStacker before the introduction of the File
Groups.
-
Dark, Flat and Offset/Bias Frames from the
Main Group may be associated to Light Frames of any group.
-
Dark, Flat and Offset/Bias Frames from others
groups may be associated only with Light Frames of the same group.
You can create as many File Groups as you want
knowing that a file may belong to only one File Group.
When you start DeepSkyStacker only the Main Group is available. As soon as you
add a file to the last available group a new empty group tab is created.
Example:
You shot the same subject two nights in a row.
For each night you have a set of Light, Dark and Flat Frames but the temperature
was not the same each night and the Dark Frames are not compatible and the
orientation was slightly different so your Flat Frames are also different
between the two nights.
To associate each Light Frame with the good Dark and Flat Frames you just need
to put all the Light+Dark+Flat Frames from the first night in one File Group and
all the Light+Dark+Flat Frames of the second night in another File Group.
Since Offset/Bias Frames are common to all the nights they must be put in the
Main Group.
DeepSkyStacker will automatically associate the Light Frames of the first night
with the Dark and Flat Frames of the first night and the Light Frames of the
second night with the Dark and Flat Frames of the second night.
The Offset/Bias Frames from the Main Group will be associated with the Light
Frames of the first and second night.
Stacking
Background
Calibration
The Background Calibration consists in normalizing the
background value of each picture before stacking it.
The background value is defined as the median value of all the pixels of the
picture.
Two options are available.
-
With the Per Channel
Background Calibration option the background for each channel is adjusted
separately to match the background of the reference frame.
-
With the RGB Channels
Calibration the three red,
green and blue
channels of each light frame are normalized to the same background value which is
the minimum of the three medians values (one for each channel) computed from the
reference frame. On top on creating compatible images (stacking wise) this
option is also creating a neutral gray background. A side effect is that the
overall saturation of the stacked image is quite low (grayscale look).
It is important to check one of
these options when using Kappa-Sigma Clipping or
Kappa-Sigma Clipping Median methods to ensure that the pictures being stacked
have all the same background value.
Automatic calibration of flat frames
The goal of the automatic calibration of flat frames is to
equalize the luminosity differences between the flat frames before combining
them into a master flat.
The first flat frame is used as a reference. The other flat frames are
normalized to match the average luminosity and dynamic range of the first flat
frame.
Automatic Detection and Removal of hot pixels
The goal of the automatic detection and removal of hot pixels
is to replace hot pixels with a value computed from neighbor pixels.
First the very hot pixels are identified by an analysis of the dark frames (or
the master dark frame if available). Every pixel which value is greater than
[median] + 16 x [standard deviation] (sigma) is marked as a hot pixel.
For all those pixels the value in the calibrated image (after offset/bias
subtraction, dark subtraction and flat division) is interpolated from the
neighbor pixels.
Automatic Detection and Removal of
bad columns
On some monochrome CCD chip some columns are either dead or
completely saturated because of blooming created by hot pixels.
The detection and removal of bad columns may be used in these cases.
It automatically detects 1 pixel wide vertical lines that are either saturated
or completely dead and deal with these lines as if they were hot pixels by
interpolation their values from neighboring pixels.
Entropy-based Dark Frame Subtraction
Dark subtraction can be optionally optimized so that the
entropy of the resulting picture (light frame minus dark frame) is minimized by
applying a coefficient between 0 and 1 to the dark frame.
The main goal of this optimization is the possibility to use dark frames not
taken in optimal conditions (especially concerning temperature).
For more information about this method you can consult the following document:
Entropy-Based Dark Frame Subtraction
Stacking
process
The
stacking process of DeepSkyStacker is very classical.
Step 1
Creation of the master offset from all the offset frames (with the selected
method).
If more than one offset frame is checked, a master offset is created as
MasterOffset_ISOxxx.tif (TIFF 8, 16 or 32 bit) in the folder of the first offset frame.
This file may be used as the only offset frame the next time.
Step 2
Creation of the master dark from all the dark frames (with the selected
method). The master offset is
subtracted from each dark frame.
If more than one dark frame is checked, a master dark is created as
MasterDark_ISOxxx_yyys.tif (TIFF 8, 16 or 32 bit) in the folder of the first dark frame.
This file may be used as the only dark frame the next time.
Creation of the master dark flat from all the dark flat frames (with the selected
method). The master offset is
subtracted from each dark flat frame.
If more than one dark flat frame is checked, a master dark flat is created as MasterDarkFlat_ISOxxx_yyys.tif (TIFF 8, 16 or 32 bit) in the folder of the first dark
flat frame.
This file may be used as the only dark flat frame the next time.
Step 3
Creation of the master flat from all the flat frames (with the selected
method). The master offset and dark flat are
subtracted from each flat frame. The master flat is automatically calibrated.
If more than one flat frame is checked, a master flat is created as
MasterFlat_ISOxxx.tif (TIFF 8, 16 or 32 bit) in the folder of the first flat frame.
This file may be used as the only flat frame the next time.
Step 4
Computing of all offsets and rotations for all the light frames that will be
stacked.
Step 5
Creation of the final picture by adding all the light frames with the
selected method.
The master
offset and the master dark are automatically subtracted from each light frame and the result
is divided by the calibrated master flat, then if the option is enabled the hot
pixels detected in the dark frame are removed and the value is interpolated from
neighbors..
Step 6
When the
Bayer drizzle is enabled, the three RGB components are normalized to avoid
the information's holes.
Step 7
The resulting picture is automatically saved in an AutoSave.tif file
which is created in the folder of the first light frame.
RGB Channels Alignment
When
this option is enabled DeepSkyStacker attempts to align the three channels to
reduce the color shift between the channels on the resulting image.
The main visible effect is that the stars are not anymore red on one side and
blue on the other side.
Each channel is registered (the stars are detected) and a transformation is
computed between the best channel and the two others.
The transformation is then applied to the two channels which is aligning them on
the best channel.
Automatic use of previously created master files
The
existing master files (dark, bias, flat and dark flat) created from a list of files are
automatically used whenever possible as long as:
- The list of the files used to create them has not changed.
- The settings used to create them are not modified. This includes the combining
method and parameters and the RAW or FITS DDP settings when RAW or FITS files
are used.
A text file containing the parameters and the list of the files used to create
the master image is saved in the folder of the master file.
The file is named after the master file name with a .Description.txt extension.
When the description is not matching the new settings the master files are
automatically created again.
This feature is transparent for the user who only sees a faster processing
because it is not necessary to create the master files again.
Using a Custom
Rectangle
You can tell DeepSkyStacker to use a Custom Rectangle which
will define the position and the size of the resulting image.
First, you need to preview an image by clicking on it in the list. You can
select any image, but since you are defining the rectangle of what will be
visible in the final image you should select the reference light frame (the one
with the highest score or the one you decided to use as the reference light
frame by using the context menu).
Then you just select on the image the rectangle that you wish to use as a Custom
Rectangle.
When you will start the stacking process, the rectangle you just created will be
selected by default as the stacking mode.
This option may be really helpful when used along with the
Drizzle option that double or triple the size of the resulting image and
thus is using much more memory and disk space during the stacking process.
Indeed, when a Custom Rectangle is used, DeepSkyStacker is only using the memory
and disk space needed to create an image the size of the Custom Rectangle.
Stacking Methods
Average
This is the simplest method. The mean of all the pixels in the stack is
computed for each pixel.
Median
This is the default method used when creating the masters dark, flat and
offset/bias. The median value of the pixels in the stack is computed for each
pixel.
Maximum
This is and ultra simple method which should be use with a lot of care. The
maximum value of all the pixels in the stack is computed for each pixel.
It may be useful to find what is wrong in a stack by exhibiting all the defects
of all the calibrated images.
Kappa-Sigma Clipping
This method is used to reject deviant pixels iteratively.
Two parameters are used: the number of iterations and the standard deviation
multiplier used (Kappa).
For each iteration, the mean and standard deviation (Sigma) of the pixels in the
stack are computed.
Each pixel which value is farthest from the mean than more than Kappa *
Sigma is rejected.
The mean of the remaining pixels in the stack is computed for each pixel.
Median Kappa-Sigma Clipping
This method is similar to the Kappa-Sigma Clipping method but instead of
rejected the pixel values, they are replaced by the median value.
Auto Adaptive Weighted
Average
This weighted average is adapted from the work of Dr. Peter
B. Stetson (see The
Techniques of Least Squares and Stellar Photometry with CCDs - Peter B.
Stetson 1989).
This method computes a robust average obtained by iteratively weighting each
pixel from the deviation from the mean comparatively to the standard deviation.
Entropy Weighted Average (High Dynamic Range)
This method is based on the work of German, Jenkin and Lesperance (see
Entropy-Based image merging - 2005) and is used to stack the picture while
keeping for each pixel the best dynamic.
It is particularly useful when stacking pictures taken with different exposure
times and ISO speeds, and it creates an averaged picture with the best possible
dynamic. To put it simply it avoids burning galaxies and nebula centers.
Note: this method is very CPU and memory intensive.
Drizzle
Drizzle is a method developed by the NASA for the
Hubble Deep Field observations made by the Hubble Space Telescope.
The algorithm is also known as Variable Pixel Linear Reconstruction.
It has a wide range of usages among which it can be used to enhance de resolution
of a stack of images compared to the resolution of a single image while
preserving the characteristics of the image (color, brightness).
|
Basically each image is super sampled just
before being stacked, like twice or thrice enlarged (it can be any value
greater than 1 but DeepSkyStacker is only proposing 2 or 3 which are common
values), then projected on a finer grid of pixels.
The result is that the size of the final image is doubled (or tripled) and
that a small object that was occupying only a few dozens pixels, will be
using twice or thrice the number of pixels and will be easier to post
process. |
 |
|
What and when you need to use the drizzle option
Basically you need only to have a lot of images which must not be perfectly
aligned (a few pixels drift is enough).
It makes no sense to
drizzle if you have only a few light frames.
Drizzling is particularly good at enhancing the resolution so it is very
useful when shooting small objects with a short focal length.
On the right is a example of an almost unprocessed M57 (shot using a 10", F/D
4.72 OTA with a Canon DSLR).
Usually M57 is very small, but by using a 2x drizzle and around 100 light
frames the resulting image is twice bigger and the resolution is much
better.
Mouse over to see the
unprocessed M57 - No Drizzle (enlarged 4 times)
unprocessed M57 - 2x Drizzle (enlarged 2 times) |

M57 - No Drizzle |
Side effects of drizzling
The main side effect is that the amount of memory and disk space necessary to
create and process drizzled images is multiplied by the square of the Drizzle
factor. Of course the time needed to create such images is also much longer.
For example, using a 2x Drizzle with 3000x2000 pixel images will create a
6000x4000 pixel image, which will need 4 times the memory and disk space size,
and will be much longer to create.
When using the 3x Drizzle option, everything is multiplied by 9 (3 squared) and
unless you have a very powerful machine and a lot of memory and disk space
available you don't want to use this on classic DSLR images.
However, on some small images (like the one created by the first DSI and LPI
cameras), it could make sense to use the 3x Drizzle option to enhance the
resolution.
A good way to limit the increase of memory and disk space necessary to use the
Drizzle option is to use a Custom Rectangle.
Drizzle and Bayer Drizzle
Although they are using two flavors of the Drizzle method, it is not
recommended to use the Drizzle and Bayer Drizzle option together.
DeepSkyStacker is issuing a warning when you try to do so.
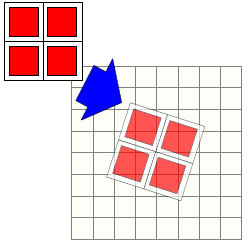
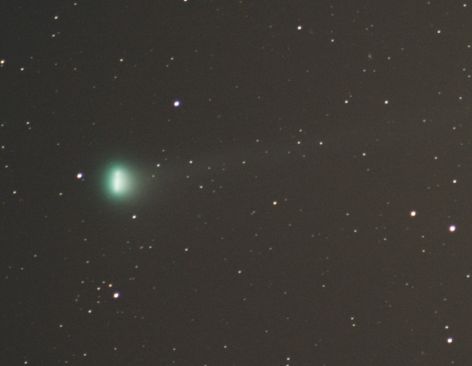
Comet Stacking
Comets are fast moving objects and when comet images
are stacked together two things may happen:
- if the alignment between the images is made using the stars, the comet is
fuzzy
- if the alignment between the images is made using the comet, the stars are
showing trails.
Starting with version 3.0, DeepSkyStacker is adding two comet stacking options:
- Create an image aligned on the comet that will have star trails
- Create an image aligned on the comet and on the stars that will not have star
trails.
Here is an example of the different stacking modes (mouse over the text to see
the result)
|
Standard stacking
The comet position is ignored.
The comet is fuzzy and the stars have no trail.
Comet stacking : star trails
The comet position is used, the image is aligned on the comet.
Star positions are used to compensate any field rotation.
Comet and stars stacking : "star freeze effect"
The comet position is used.
A first stack is created to extract the comet from the background.
Then a second stack is created to freeze the star (the comet is subtracted from
each calibrated and registered light frame before stacking it).
Last, the final image is obtained by inserting the comet back in the image.
|
 |
If you plan to align the image on the stars, you don't need to do what is
described in the following paragraphs since it's the default behavior.
What you need to do
Step 1: Register the comet center
DeepSkyStacker can not automatically
detect the comet center in the light frames.
First, you must set the comet position in all your light frames. It is
done only once.
To do this, just select a light frame in the list and using the
Edit Comet Mode set the comet center.
If the comet center is too faint or too bright you can force DeepSkyStacker to
accept any position by holding down the Shift key while positioning the comet
center.
Then save the result by clicking on the Save Changes button in the toolbar.
If you don't DeepSkyStacker will ask you and you will have an option to save the
changes automatically.
Once the comet position is set and saved you will see a +(C) added to the star
count in the #Stars column of the list.
You must repeat the operation for each light frame.
Hint
If the date/time of the images is accurate (like when using
DSLRs and some CCD camera) you can sort the images by date/time and set the
position of the comet only to the first and last light frames and reference
frame (the one with the highest score if you have not used the context menu
to force another frame).
DeepSkyStacker will then compute automatically (just before stacking) the
position of the comet center in all the light frames in the time span from
which the comet center is not set.
To do this it will use the elapsed time between the first image and each
image to interpolate the position of the comet. |
Step 2: Select the stacking mode
This is done in the
Comet tab available in the stacking
parameters dialog.
The Comet tab is available only if at least two light frames (including the
reference light frame) have a registered comet.
From this tab you can select one of the three available Comet Stacking options.
Mixing Comet and non Comet images
DeepSkyStacker can use images with a registered comet and images without a
registered comet in the same stack.
This may be very useful to get a better signal to noise ratio on the resulting
image especially in faint background details (a comet passing near a galaxy or a
nebula for example).
Which stacking methods
If you are looking to create images with star trails, average is the best
method.
In all others cases you should use Median stacking with small stacks and
kappa-sigma with large stacks.
What results you can expect
Obviously the most demanding algorithm is the Comet and Stars stacking leading
to the star freeze effect.
Slow moving comets are leading to hard to detect large objects or big stars and
in this case the comet extraction process may be less than perfect.
In all cases, if you take a set of images from the same area without the comet
(the day after or before) it will improve a lot the look of the final image.
RAW images development process
RAW
files decoding
The RAW files
created by
the DSLRs are decoded using LibRaw Copyright
© 2008-2019 LibRaw LLC, which is based on the original DCRaw by Dave Coffin.
DeepSkyStacker uses the
latest version of LibRaw available at the time it was released, and will warn you
if your camera isn't supported.
RAW files
development process
A
file is the equivalent of the digital negative. Thus, each raw file needs a
development process.
There are two kinds of raw files: the one using a Bayer matrix (most of them)
and the one not using a Bayer matrix (for example the one using a Foveon chip).
During the following explanations I will only consider the raw files created by
a Bayer matrix based DSLR.
Bayer
Matrix
First, a small reminder of what is the Bayer matrix
When you are using an 8 mega-pixels DSLR, the CMOS or CCD chip is a black and
white chip of 8 mega-pixels on which is glued a Bayer matrix which is in fact a
pattern of RGBG or CYMK filters in front of each pixel (other patterns are
possible)
In the case of RGBG filters a fourth of the pixels are capturing
red, another fourth blue
and the remaining half green.
So your 8 mega-pixels DSLR is producing pictures with 2 millions red pixels, the
same amount of blue pixels and 4 millions green pixels.
Then how the DSLR is creating "true" colors pictures?
Very simply by interpolating the missing primary colors from neighboring pixels.
Color reconstruction using the Bayer matrix -
Interpolation
|
The first way to reconstruct the
colors from the Bayer matrix is to interpolate the missing primaries from
the neighboring pixels.
A lot of different interpolation methods are
available producing bad to good results (linear, gradient...) but all are
degrading the quality of the final picture by guessing what the missing
colors should be.
When each picture is slightly blurred by the
interpolating process, the stacking of several pictures is loosing a lot of
fine details.
If you still plan to use the interpolation method know that the software
coming with your DSLR is probably the worst choice when it comes to
preserving quality in astrophotography pictures.
If you were using it to transform your raw files to 16 bit TIFF files you
will instantly see an improvement by using DeepSkyStacker.
|
 |
Color reconstruction using the Bayer matrix -
Super-pixel
|
With LibRaw it is possible to
access the Bayer matrix before any interpolation. Thus it is possible to use
other methods to reconstruct the true colors without guessing the missing
primaries with interpolation.
The Super Pixel method does not interpolate but
instead creates a single super pixel from each group of four pixels (RGBG).
Indeed each group of 4 pixels contains all the necessary information for
each primary and the luminance.
This method is very simple and has the drawback (or is it a bonus) to divide
the size of the resulting picture by 4.
The Super Pixel method is giving very good results when only a few pictures are
available for the stacking process.
|
 |
Color reconstruction
using the Bayer matrix - Bayer drizzle
|
The last method which was
suggested by Dave Coffin uses the property of the stacking process to
compute the true RGB values of each resulting pixel by using the "natural"
drift existing between each picture.
When a large number of pictures is available and with its sub pixel
alignment, DeepSkyStacker computes bit by bit the true values of each
primary for each pixel, all without any interpolation.
After the stacking process another algorithm is used to normalize the RGB
values to avoid information's holes.
The Bayer Drizzle method gives excellent results when a large number of
light frames is available and when the guiding precision is greater than one
pixel (which is almost always the case). |
 |