User's Manual
The command line User's Manual is available
here
Introduction
Quick Start
Registering and Stacking Tab
Batch Stacking
Processing Tab
Create a Star Mask
The Picture List
Picture Preview (Stars and Comet editing)
RAW and FITS DDP Settings
Introduction
The purpose of this short manual is to explain the features
and principles of DeepSkyStacker.
|
The user interface of
DeepSkyStacker is quite simple and intuitive and all the main features and
commands are
readily available.
The user interface is divided into two areas:
To the left a set of tabs gives access to all the commands and features.
To the right a screen depending of the current tab that is used to
configure and view.
To change the current tab you can click
anywhere in the tab.
|
If
you are a beginner in astrophotography and you are wondering what are light,
dark, flat and bias frames and how to create them you have a short
explanation here.
|
|
 |
Quick Start
You are just out of a busy night and you just have downloaded all
your pictures (lights, darks, offsets and flats) to your PC.
The first step is to add all the pictures (accordingly to their type) to the
list.
To do this you use the commands of the left area:
- add picture files
- add dark files
- add flat files
- add offset/bias files
- add dark flat files
Then you just launch the registering process, you check
the "Stack after registering" box after entering the percentage of pictures
that you wish to keep for the stacking process after the registering process.
If you are using raw files (which is highly
recommended), you just check the Raw DDP settings and you start the registering
process.
You can now go to sleep knowing that after a good night you will view the first
results in the processing tab.
Note that even if your PC crashes after the stacking process, the result is
automatically saved in a special file:
AutoSave.tif.
Registering and Stacking Tab
The Registering and Stacking Tab contains all the
commands and features pertaining to the registering and stacking processes.
From this tab, you can add
frame of each type (light, dark, flat and
offset/bias) to the list, save and restore File Lists, preview images and start the
registering or stacking process
|
It is possible to add files to the list by
simply dragging & dropping them from the file explorer.
The files type will then be asked before
the files are added to the list. |
The right area contains the Pictures List and the
Picture Preview.
On the bottom of the picture list a line of tabs gives access to each file
group. If you click on one group tab the files of the group are shown in the
list.
To know more about the file groups you can consult the technical details
here.
To the top and the right a slider may be use
to change the gamma of the previewed image which may be useful to view faint
objects.
Of course no modification is made to the real image as it is only a
previewing trick.
|
It is possible to automatically launch the stacking process after the
registering process by giving the percentage of light frames that will be kept.
The best pictures, based on the
score
computed by the registering process, will then be stacked. |
|
 |
The "Compute offsets" feature may be used to compute the offsets and rotation
angles between the pictures without starting the stacking process. Once computed
the dX, dY and angle columns of the pictures list are populated with the
computed offsets and rotation angles.
Note: it is not necessary to
compute the offsets manually prior to the stacking process since the offsets and
rotation
angles are automatically
computed just before the stacking process anyway.
The "Check above a threshold..." may be used to check all the pictures for which
the
score
is greater than or equal to the given threshold value.
|
Before the stacking process a screen
recapitulates the different steps.
It is important to know that the light frames will be automatically
associated with their dark frames using ISO speed and exposure time.
Flat frames and Offset/Bias frames will be automatically associated
regarding only the ISO speed.
In each case the best matching frames will be proposed and a warning will be
issued if ISO speed and/or exposure time are not matching.
|
It is possible to temporarily "force" the ISO speed and
exposure time by using the context menu of the
files. |
From this dialog you can also change the
stacking methods for each type of picture by clicking directly on the link
or on the "Stacking Parameters" button.
|
 |
A new dialog is then opened, from which you
can modify the folder into which are created the temporary files needed by
the stacking process and all the settings controlling the stacking process. The first tab is used to set the stacking mode
among which the possibility to use a
Custom Rectangle.
You should note that in all modes the offsets are computed from the
reference frame, so it's not a true mosaic mode but a pseudo mosaic.
This is also where you can
choose the Drizzle option
when stacking.
|
The drizzle option
creates image 4 or 9 times bigger.
For already large DSLR images it can create very large images and
DeepSkyStacker may need a lot of memory and disk space to
process them. |
|
 |
|
The other
light, dark, flat and bias tabs are used to modify the stacking method for each type of
frame, and to
activate the background
calibration option for the light frames or the automatic
detection and removal of hot pixels
and bad columns detection and
removal
for the dark frames. |
 |
The Alignment
tab may be used to change the alignment method used to align light frames.
You can choose Bilinear, Bisquared or Bicubic
transformation or you can DeepSkyStacker select the best transformation
based on the number of available stars. |
 |
|
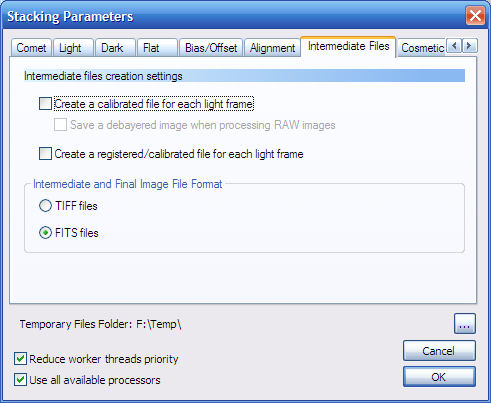
This tab is used to control the creation
of intermediate files.
Two options may be used to create files
containing intermediate images:
The first option may be use to create a file containing the calibrated image
for each light frame.
The second option may be used to create a file containing the calibrated and registered image for each
light frame.
The created files have the name and location of the matching light frame with
a .cal.tif or .cal.fts extension for the calibrated images and .reg.tif or .reg.fts extension for
the registered and calibrated images.
The files are always uncompressed TIFF or FITS files, monochrome or
color, 8, 16 or 32 bit depending of the light frame bit depth.
|
When you check one of these options be
sure to have enough free hard disk space to host all the created files. |
|
 |
|
This
tab is to control the way the calibrated images are cleaned before stacking.
The goal is to detect and
clean remaining hot or cold pixels after calibration.
Checking these options may
seriously alter the resulting image so use them with caution.
Two parameters are needed to
define the behavior of the cosmetic cleaning.
The first parameter is the
size of the filter used to detect and fix the hot/cold pixels. The larger
the filter, the longer the processing time and the smoother the resulting
image.
The second parameter is the
threshold under which no correction is done (the pixel value remain the
same).
A lower threshold means that more correction are done.
The last option may be
checked to create an image showing the cleaned pixels for each light frame.
In this image, cleaned hot pixels are white, cleaned cold pixels are dark
gray and all the other pixels are light gray.
The created files have the name and location of the matching light frame
with a .cosmetic.tif or .cosmetic.fts extension as defined in the previous
tab.
|
 |
|
The Comet tab is
available only when at least two light frames (including the reference light
frame) have a comet registered.
In this
case the Comet tab is used to select the comet stacking mode between the 3
available modes.
See the Comet Stacking topic in
the Technical Details for information on how to use Comet Stacking. |
 |
After the stacking process, the resulting image is saved in the AutoSave.tif file
which is created in the folder of the reference light frame..
If an Autosave.tif file already exists in the folder, an Autosave001.tif (002,
003, ...) is created.
Batch Stacking
The Batch Stacking dialog is used to
create resulting images from more than one stack.
|
For example it may be used
to create the resulting images from the red, green, blue and luminance
images without the need to load each list then start manually the stacking
process for each one.
Of course it also may be used to stack any existing list.
You just need to add the file lists previously created by the Save File List
command to the list.
Each File List that is checked will be processed.
At the end of the stacking
process, the output file name replaces the list name for each processed file
list.
Notes:
|

|
Processing Tab
The processing tab contains the commands
and features pertaining to post processing.
|
I would like to remind here that
DeepSkyStacker only allows simple processing treatments of the resulting
picture in order to quickly view the result of the stacking process.
The heavy post processing should take place in another more specialized
software.
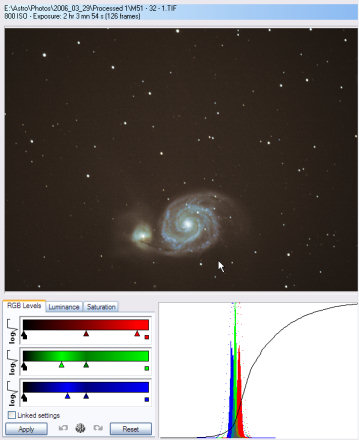
The processing tab contains a
preview of the RGB histogram and three sub tabs which are used to adjust the
following settings::
- RGB levels
- Luminance curve
- Saturation
RGB levels and luminance curve adjustments are directly visible on the RGB
histogram.
|
 |
Adjusting the RGB Levels
|
The RGB levels adjustments are
controlled by:
The kind a adjustment that you can modify by clicking on the adjustment
name. The available adjustments are linear, square root, cubic root,
logarithm, log(log), log(square root) and asinh..
The modifiable limits for each channel (left cursor for the minimum, right
cursor for the maximum).
The modifiable offset for each channel (middle cursor).
The RGB levels adjustment may be done independently for each channel or for
all the channels at the same time when the "Linked settings" option is
checked.. |
 |
The simplest way to understand how the different
parameters are working is to change them and look at the result on the
histogram..
Adjusting the Luminance Curve
|
The luminance curve is
controlled by 6 parameters.
- 2 for the darkness area.
- 2 for the midtone area
- 2 for the highlight area.
These parameters are controlling a Bezier curve used to transform the
luminance.
Simply put the parameters are the angle and power of the curve for each
point.
The advantage of using only 6 parameters is that on one hand it is possible
to quickly view the result and on the other hand that it is possible to
memorize the parameters to apply them on another picture. |
 |
The simplest way to understand how the different
parameters are working is to change them and look at the resulting the luminance
adjustment curve (black curve) on the histogram.
Adjusting the Saturation
The saturation level adjustment is just a percentage of increasing or decreasing
the saturation level.
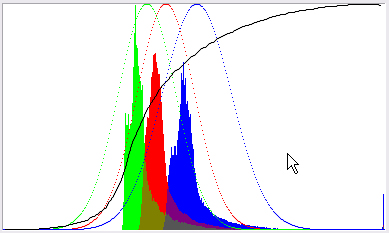
RGB Histogram
|
The RGB histogram is used to
visualize for each channel (R, G and B) the red, green and blue pixels
distribution in the picture.
The black curve is the luminance adjustment curve.
Moreover, to help the equalization of the channels the Gaussian curve for
each channel is drawn on top of the histogram. |
 |
Saving/Loading adjustment parameters
Undo/Redo adjustment parameters
On the bottom of each tab a set of buttons is available:
- to apply the last modifications to the picture
- to undo the last applied modifications
- to redo the last undone modifications
- to reset all the values
- to access a dialog used to save/load a named set of parameters.
Loading a picture
DeepSkyStacker can load DSImage images (created
only after the stacking process), TIFF images (8, 16 and 32 bit, gray
levels or RGB) or FITS images (8, 16, 32 and 64 bit, gray
levels or RGB).
At the end of the stacking process the AutoSave.tif picture is automatically
loaded.
Saving the resulting picture
|
DeepSkyStacker can save the
resulting image as 16 or 32 bit TIFF or FITS files using two methods::
- by applying the adjustments
- by not applying the adjustments (but storing them in the case of the TIFF
file in order to continue the post processing the next time the image is
loaded by DeepSkyStacker).
|
 |
For more information about the saving methods you
can read the faq.
Create a Star Mask
Using a Star Mask is often very useful
during post-processing to use different processing techniques for the stars and
for the rest of the image.
The Create a Star Mask feature may be used to create a variety of star masks
that can be used later in any software you are using to post process (Photoshop, PixInsight, ...).
DeepSkyStacker is only creating star mask files.
It is not using them in any way.
You can view this feature as a tool intended to provide quickly and simply a
star mask file based on real star detection.
|
What is a star mask?
A star mask is a synthetic grayscale image on which each bright enough star is
replaced by a round white area which is fading to black following a curve.
You can see an example of a star mask on the right.
Mouse over the text to see
the image or the star mask. |

Star Field |
|
Star Mask Creation
To create a Star Mask you must load an image in the processing tab.
Then just click on
the Create Star Mask... menu on the right and the dialog on the right will
open. From there you
can change the shape of the stars in the mask, the star detection threshold
and a few other parameters.
Once you are done, just click on the OK button
and you will be asked to select a file (either a TIFF or a FITS file) in
which the star mask will be saved.
The saved file is always a grayscale 16 bit
image. It is not automatically loaded by DeepSkyStacker.
The star mask is always created from the image
as you see it in DeepSkyStacker which means with the current adjustments
applied. |
 |
The
Picture List
The picture list, common to Registering
and Stacking processes contains all the pictures used by the registering and stacking
processes.
- Light frames
- Dark frames
- Flat frames
- bias/offsets frames
Only the checked pictures are used by the registering and stacking processes.
The list contains the following columns:
| Checkbox |
checked if the picture should be
used |
| Path |
Path to the picture file |
| File |
Name of the picture file |
| Type |
Picture type:
Light
Dark
Flat
Dark Flat
Bias |
| Score |
Picture score computed by the
registering process or
N/A for dark, flat and bias/offsets frames.
When you have selected a frame as the reference frame using the
context menu, the score is preceded by (*). |
| dX |
X offset (in pixels) computed
for the stacking process |
| dY |
Y offset (in pixels) computed
for the stacking process |
| Angle |
Rotation angle (in °) computed
for the stacking process |
| Date/Time |
Date and Time of the file |
| Size |
Size of the picture in pixel
(Width x Height) |
| CFA |
Yes if the picture is resulting
from a Color Filter Array (CFA) which is the case of all the RAW pictures
using a Bayer matrix. |
| Depth |
Type (gray levels or RGB) and
number of bits per channel of the picture. |
| Infos |
Extra information about the
picture (RAW with DSLR information, TIFF or Other) |
| ISO Speed |
ISO Speed of the picture |
| Exposure |
Exposure time of the picture |
| FWHM |
FWHM: Full Width Half Maximum
value. (in pixel)
This is the average for all the detected stars |
| #Stars |
Number of
detected stars.
When a comet position is set a +(C) is appended to the number of stars |
| Sky Background |
Sky background
value for registered image in % |
You can sort the list on any column by clicking
on the column header (and by clicking again to reverse the sort order).
You can change the columns order and each column width. Everything is saved after each use of DeepSkyStacker. The
column widths order will be
reloaded the next time DeepSkyStacker is used.
You can preview a picture from the list by selecting it.
If the selected picture is a RAW file, the RAW DDP settings will be used to
decode the RAW file before previewing it.
|
You can select multiple files in the list.
A context menu is available (mouse right button) to manually select the
reference frame of the stack, change the file type, check or uncheck the
files, remove the files from the picture list or view, edit the properties
of the files copy the list content to the clipboard or definitively erase
files from the disk.
|
If you select a reference frame that is
not checked, the offsets will be computed from this reference frame
even if the reference frame will not be stacked. |
|

|
|
The properties dialog may be used to change the
picture type, and temporarily (only for the current session) the ISO speed
and exposure time of one or more pictures.
When changing the ISO speed and exposure time, no change is made to the real
files. The values are only stored in memory for the duration of the current session. |
 |
Picture Preview
The picture preview is used to quickly
view a picture from the picture list (Registering and Stacking Tabs) or to view
the picture being processed (Processing Tab).
You can zoom in and zoom out by pointing the mouse and using the wheel. This is
the only way to pan and to zoom.
Star and Comet editing
|
When a light frame is selected in the registering and
stacking tab it is possible:
-
To edit the star positions:
Stars detected by DeepSkyStacker will be coloured green. You
can select extra stars or deselect the ones DeepSkyStacker detected by
left clicking with the mouse.
-
To
edit the comet position
-
You can select one of the above modes using the toolbar in the bottom right
corner of the image.
The last item of the toolbar
is used to save the changes.
|
Comet editing note:
The comet center may not be automatically detected by DeepSkyStacker.
To force the comet to a given position hold down the
Shift key while positioning the comet center. |
|

|
|
When used from the processing
tab, the picture preview may be used to select a part of the image by
drawing a rectangle directly on the picture.
This rectangle is used on one hand to apply
the adjustments only to this rectangle and on the other hand, optionally, to
save only a part of the image.
If no rectangle is defined the adjustments
are applied to the full image.
In all the cases, when the
image is saved
to disk the adjustments are applied to the full image. |
 |
Raw and FITS DDP settings
The Raw DDP settings dialog gives access
to all the parameters used while developing a RAW file to transform it into a picture.
|
RAW Files
The parameters are:
The Color Adjustment is applied
after the White Balance adjustments for Daylight White Balance (the
default) or Camara White Balance (if selected). The white
balance adjustment values are extracted from the RAW files by LibRaw Copyright © 2008-2019
LibRaw LLC. LibRaw is based upon the original DCRaw decoder for
RAW files written by Dave Coffin. Use Auto White Balance is no
longer supported.
The values for the Red and
Blue scales are relative to the
Green.
The luminance adjustment applies to all three channels.
More information about the interpolation mode and the specific behavior of the
Bayer matrix optimization, is available in the
technical details.
|
 |
|
FITS
Files
The only setting in this tab used for all FITS files is the Brightness
value.
It may be used to scale up 12 bit images to 16 bits images (use a value of
16 to do so).
All the other settings are only used with 16 bit B&W FITS files created by a DSLR
or a color CCD camera.
The first step is to select the DSLR or the CCD camera used to take the images from the list.
This is necessary to use the correct Bayer Filter Pattern that will be used
to decode the image transforming them from B&W to color images.
The parameters are:
- balance of the RGB channels
- interpolation mode
About the channels balance it is important to enter the values
used by your DSLR or CCD camera.
The values for the Red and
Blue scales are relative to the
Green.
The luminance adjustment applies to all three channels.
More information about the interpolation mode and the specific behavior of the
Bayer matrix optimization is available in the
technical details.
|
 |